
Lagre Gimp-bildet som en PDF-fil - hvordan det fungerer
I stedet for å lagre bildene dine i Gimp-format, kan du også eksportere bildene som en PDF-fil. Vi viser deg hvordan du får de beste resultatene.
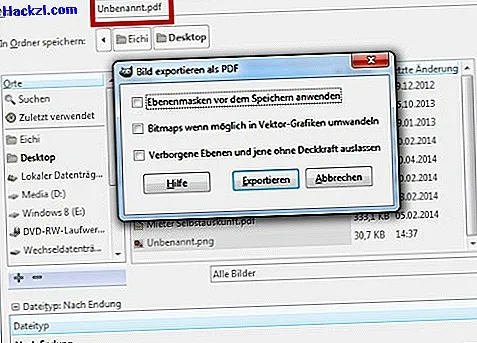
Lagre bilder i Gimp som PDF
- Start Gimp og åpne bildet du ønsker.
- Klikk på "Rediger" i menylinjen og velg "Eksporter". Alternativt er tastekombinasjonen [Ctrl] + [E] tilstrekkelig.
- Velg stedet for bildet ditt her. På slutten av filnavnet legger du til forkortelsen ".pdf". Gimp eksporterer nå grafikken din som en PDF-fil.
Hvis resultatene er dårlige: eksporter bilder som JPG
Hvis du jobber med mange lag eller med Gimp-bilder i det interne XCF-formatet, blir ofte PDF-dokumentene forskjøvet. Du kan også løse dette problemet med et lite triks:
- Eksporter bildet ditt via "Rediger"> "Eksporter" som en JPG-fil. For å gjøre dette, bare legg til utvidelsen ".webp" til filnavnet.
- Åpne deretter JPG-bildet igjen i Gimp og eksporter det som et PDF-dokument som beskrevet ovenfor.
Hele prosedyren fungerer også omvendt, selvfølgelig: Du kan for eksempel lagre PDF-filer som bilder eller redigere PDF-filer i Gimp.